Monday 16 January 2017

Three years on and still going strong!

Three years on and the guitar is still going strong and getting gigged regularly!


Saturday 14 February 2015

Taking to the stage...

After many years away from the live music scene I'm now back in a band and it only seemed fitting to christen the Lils Paul by using her for my first gig.


Here she is waiting to be played...


A quick tune up before going on...


Played beautifully, sounded amazing!


Wednesday 10 December 2014

The next projects...

Following the raging success of this build I built another kit as a birthday present for a friend.  Then following that I took on a bit more of a challenge by building a guitar for my brother but this time I didn't use a kit...


To read all about them please visit -

www.andysguitarkitbuild.blogspot.co.uk
www.lespaulflorentinebuild.blogspot.co.uk
www.mylespaul.com/forums/luthiers-corner/327597-got-wood-gonna-build.html

Friday 15 November 2013

Fitting the upgrades!

Well after turning up for work this morning and discovering I should have been on leave I decided to make good use of the unexpected time off and get some bits fitted!

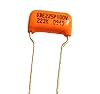
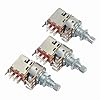
After carefully removing the stock pickups I unsoldered the old components ready for the upgrades.  Here are the capacitors and push pull pots in the wiring jig ready for soldering.


And an hour later, all fitted nice and snug in the wiring cavity.


I then got to work on levelling the frets.  First of all, using a straight edge sat on identical blocks I adjusted the truss rod until the neck was dead straight.


Then using ink on the frets to highlight high/low spots I carefully levelled the frets with an oil stone.


If you look closely you can see how uneven some of the frets were, so it's no wonder I was getting string rattle around this part of the fret board.


Once level I used a modified triangular file and needle file to re-profile, or 'dress' the frets. The frets were then gone over with fine abrasive paper to remove the tool marks and then finally buffed to a smooth polish with wire wool.


Lily was home from school so we got on with carving the name into the headstock.  Using a paper template and the engraving tool she made a wobbly start...


Because the wood kept throwing the tool off line I ended up helping her to finish it.  And hey presto the Lils Paul is born!


Tomorrow we'll get a coat of Shellac over it to protect the wood and remove the surface scratches, then we can get it re-strung, set up and finally finished!

Tuesday 12 November 2013

Upgrades!

Okay it's been a while since I last posted, joys of real life getting in the way unfortunately.
After a bit of research I've ordered some parts...

Pickups - I've gone for the Wilkinson Hot PAF's.  They are based on the same design as originally made by the Gibson Guitar Company, are cost effective and have good reviews.  I got this as pair from Vanson Guitars Ebay store as they offered the 4 wire version which allows for coil splitting.


Tone Capacitors - I've gone for Sprague Orange Drop 0.22 bought from Amazon.  They were chosen after reading reviews and advice on the My Les Paul forum

Sprague Orange Drop Capacitor .022uf for Strat Tele Gibson Etc..

Push Pull Pots - Again bought off Amazon,  I got these so I could take advantage of the split coil wiring option included with the Wilkinson Hot PAF's

3pcs B500k Push Pull Guitar Control Pot Tone Potentiometer 16mm diameter 18mm shaft

And lastly I've also ordered some strap locks because as I know from experience there is nothing worse than your precious guitar dropping to the floor because the straps come off!


I got these from Craigs Music Ebay store along with a plain black strap, and bless them, they didn't have the colour locks I ordered and because I accepted the alternative I got a free leather pick holder keyring!

Product Details

I'll get the bits fitted as soon as they get here and while the guitar is stripped down I'll also get the frets levels and dressed.

Friday 11 October 2013

School of success

Lily took the guitar into school today to show her teacher and class, everyone in school who saw it was very impressed.  She's come home with quite buzz!

Having done some looking in my books (Melvin Hiscock - Make You Own Electric Guitar and Dan Erlewine - Guitar Player Repair Guide) I've gone and got the tools we need to do the full fret dress and crown job.  All being well we'll get this done next week!

I've also recorded a wee demo.  This is simply the guitar plugged straight into my Zoom R8 digital multi-track recorder using the built in guitar effects and drum machine.  I recorded a basic rhythm track and then jammed over the top of it.


Thursday 10 October 2013

Not quite perfect yet.

After a few tweaks of the truss rod we've gotten rid of the majority of the bottoming out at the 12th fret however it looks like the fret has probably been pushed in a little too far by machine at the factory so without creating too much relief and causing an excess bow in the neck, which will make the action unplayable, it will have to have the frets levelled and dressed.  This is something I don't have the tools for at the moment so it will have to wait a little while.  However in the meantime I have shown it off to a friend who plays and he loves it so all in all definitely a success.  We'll post more when we get the tools to dress the frets